How to Set Up Charles Proxy on iPhone
Step-by-step tutorial to configure Charles Proxy on iPhone and iPad. Configure manual Wi-Fi proxy, install the certificate profile via chls.pro/ssl, enable Full Trust, and decrypt HTTPS streams.
- Manual iOS Wi-Fi configuration — configure your iPhone or iPad to route traffic through your computer LAN IP on default port 8888.
- Profile installation via Safari — download the Charles configuration profile directly from chls.pro/ssl and approve in VPN & Device Management.
- Enable Full Trust for Root Certificates — activate 100%% TLS interception trust in Settings > General > About > Certificate Trust Settings.
- Upstream carrier proxy chaining — route Charles decrypted requests through PXM2 4G/5G carrier IPs to audit geo-targeted mobile apps without bot blocks.
What Is Charles Proxy & Why Route iPhone Traffic Through It?
Charles Proxy is an HTTP/HTTPS proxy and traffic inspector that runs on your desktop workstation (macOS, Windows, or Linux). By pointing your iPhone's Wi-Fi connection to Charles, you can record, inspect, and analyze all outbound network requests initiated by iOS applications, Safari web tabs, and background background tasks.
On iOS devices, inspecting network traffic directly on the phone is cumbersome due to Apple's strict sandbox security model. Charles eliminates this limitation by serving as an unmediated man-in-the-middle (MITM) proxy. With Charles, mobile developers and QA engineers can:
Monitor REST and GraphQL requests, Bearer authorization tokens, cookies, tracking tags, and API payloads generated by any iOS app.
Generate and trust an on-the-fly Charles Root CA certificate to read encrypted TLS 1.3 traffic in cleartext JSON or XML.
Simulate poor cellular networks (3G/4G lossy conditions), mock API error responses (429, 500), and inject custom header fields.
Network requirement: Your iPhone and your computer running Charles Proxy must be connected to the exact same Wi-Fi network. Public coffee shop networks with Client Isolation will prevent your iPhone from communicating with your computer.
Prerequisites & Finding Your Computer's Local IP Address
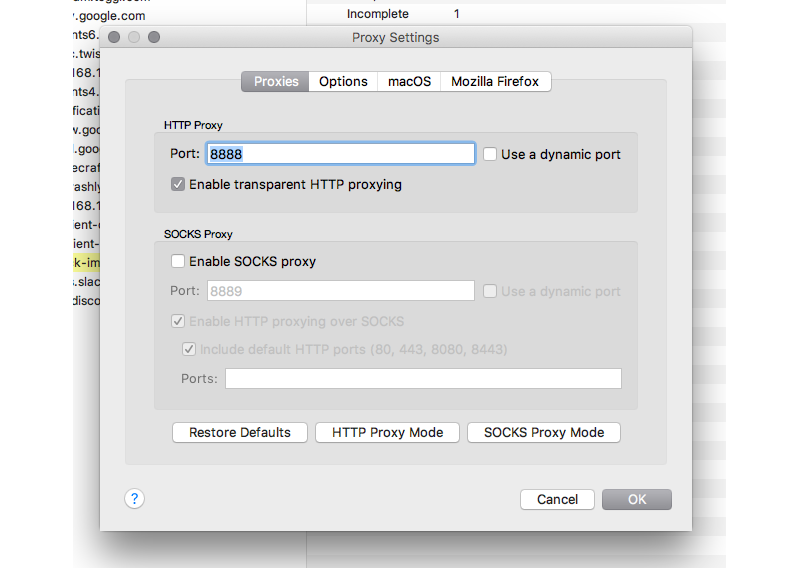
Before configuring your iPhone, install Charles Proxy on your Mac or Windows PC. Charles defaults to listening on TCP port 8888. Your iPhone needs to know your computer's local IPv4 address on the Wi-Fi subnet.
Locate your computer's local IP address using either of the following methods:
-
In Charles Proxy (Fastest)
Click top menu Help > Local IP Address. A small dialog will display your current local network IPv4 address (e.g. 192.168.1.100 or 10.0.0.15).
-
In macOS System Settings
Open System Settings > Wi-Fi > Details next to your active network to view your IPv4 Address.
-
In Windows Terminal
Open PowerShell or Command Prompt, run ipconfig, and note the IPv4 Address under your active Wi-Fi adapter.
# macOS terminal command:
ipconfig getifaddr en0

# Windows Command Prompt:
ipconfig | findstr /i "IPv4"
Step 1: Configure iPhone Wi-Fi Manual Proxy
With Charles running and your computer's IP confirmed, configure your iPhone to send all outbound HTTP/HTTPS traffic to Charles.
-
Open iPhone Wi-Fi Settings
On your iPhone, go to Settings > Wi-Fi. Ensure you are connected to the same Wi-Fi network as your computer.
-
Open Network Information
Tap the blue (i) information icon next to your connected Wi-Fi network name.
-
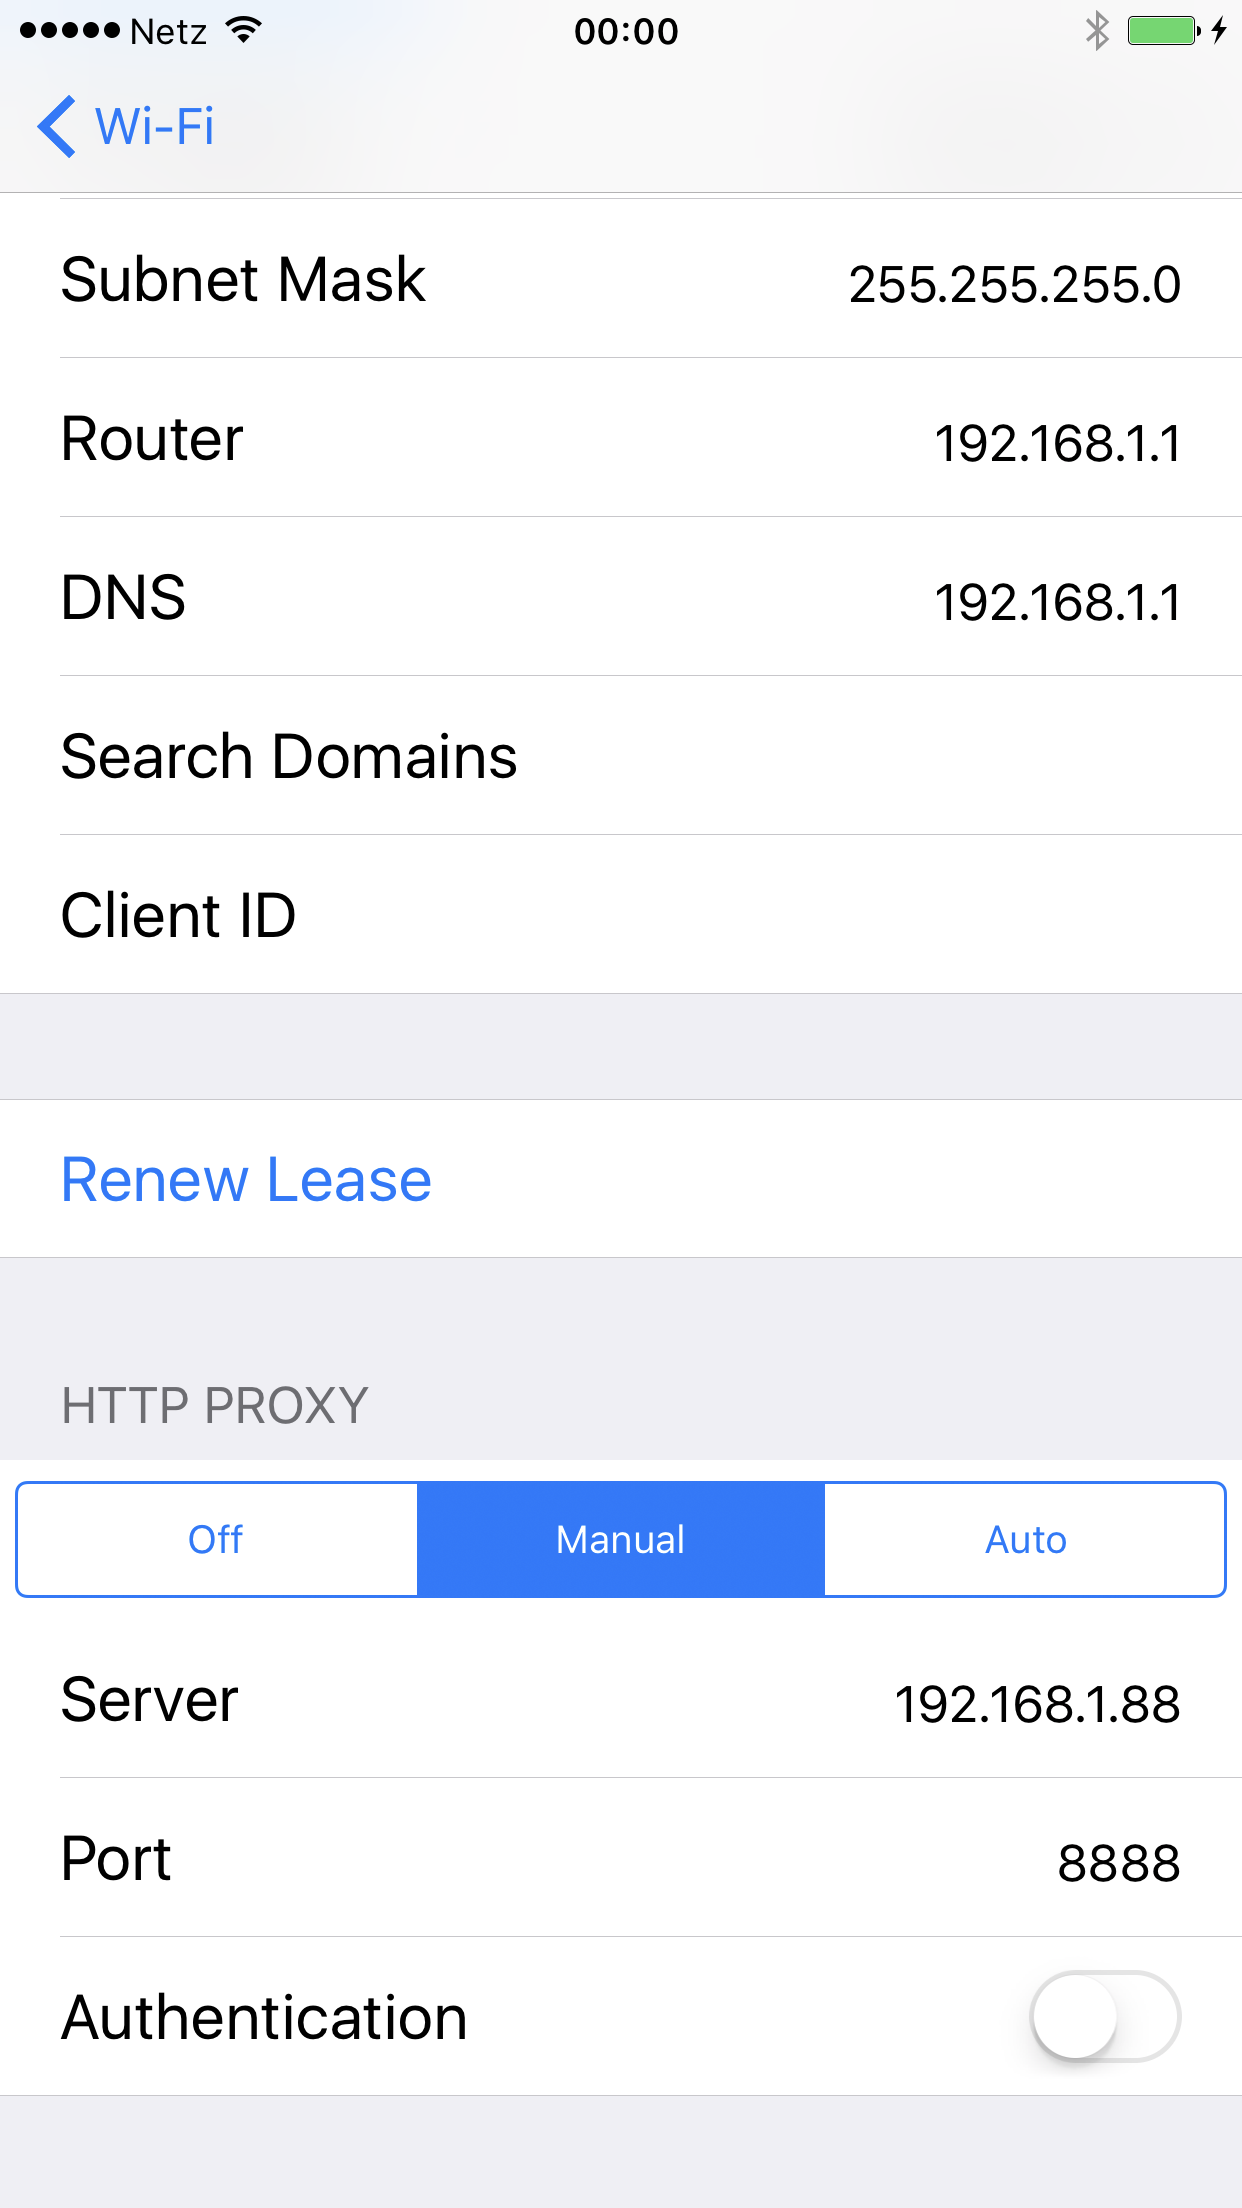
Set Configure Proxy to Manual
Scroll to the bottom of the screen and tap "Configure Proxy". Select "Manual".
-
Enter Server IP & Port 8888
Under Server, enter your computer's local IP address (e.g. 192.168.1.100). Under Port, enter 8888. Ensure Authentication is toggled OFF. Tap Save in the top-right corner.
Step 2: Allow the iPhone Connection in Charles
The moment your iPhone sends its first network request through the proxy, Charles detects an incoming connection from a new local IP address.
A prompt will appear on your desktop screen: "A connection attempt from [iPhone IP] was received. Do you want to allow it?"
-
Click Allow
Click "Allow" immediately on your computer. Charles will register your iPhone's IP address in its Access Control list.
-
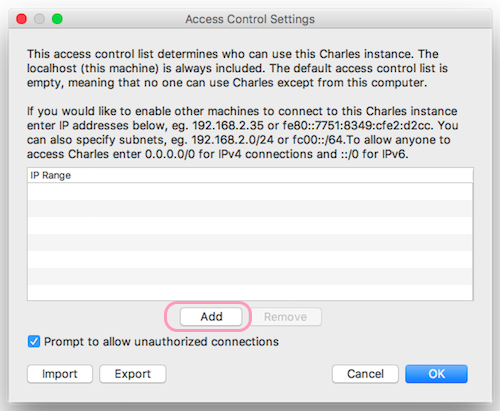
Verify Access Control Settings (If Prompt Did Not Show)
If you accidentally clicked "Deny" or the prompt was missed, go to Proxy > Access Control Settings in Charles. Click "Add" and enter your iPhone's IP or subnet (e.g. 192.168.1.0/24).

Step 3: Download & Install the Charles Profile in iOS
At this point, plain HTTP requests will show up in Charles. However, all HTTPS traffic will appear as encrypted CONNECT tunnels with padlock icons. To decrypt SSL/TLS traffic, iOS must install the Charles Root Certificate configuration profile.
-
Open Safari on your iPhone
With the Wi-Fi proxy active, open Safari. (Do not use third-party browsers like Chrome for this step, as Safari integrates directly with Apple's Profile Installer).
-
Navigate to chls.pro/ssl
In Safari's address bar, navigate to https://chls.pro/ssl (or http://chls.pro/ssl). Charles will intercept this URL and serve the configuration profile.
-
Allow Profile Download
Safari will display a popup: "This website is trying to download a configuration profile. Do you want to allow this?" Tap "Allow", then tap "Close".
-
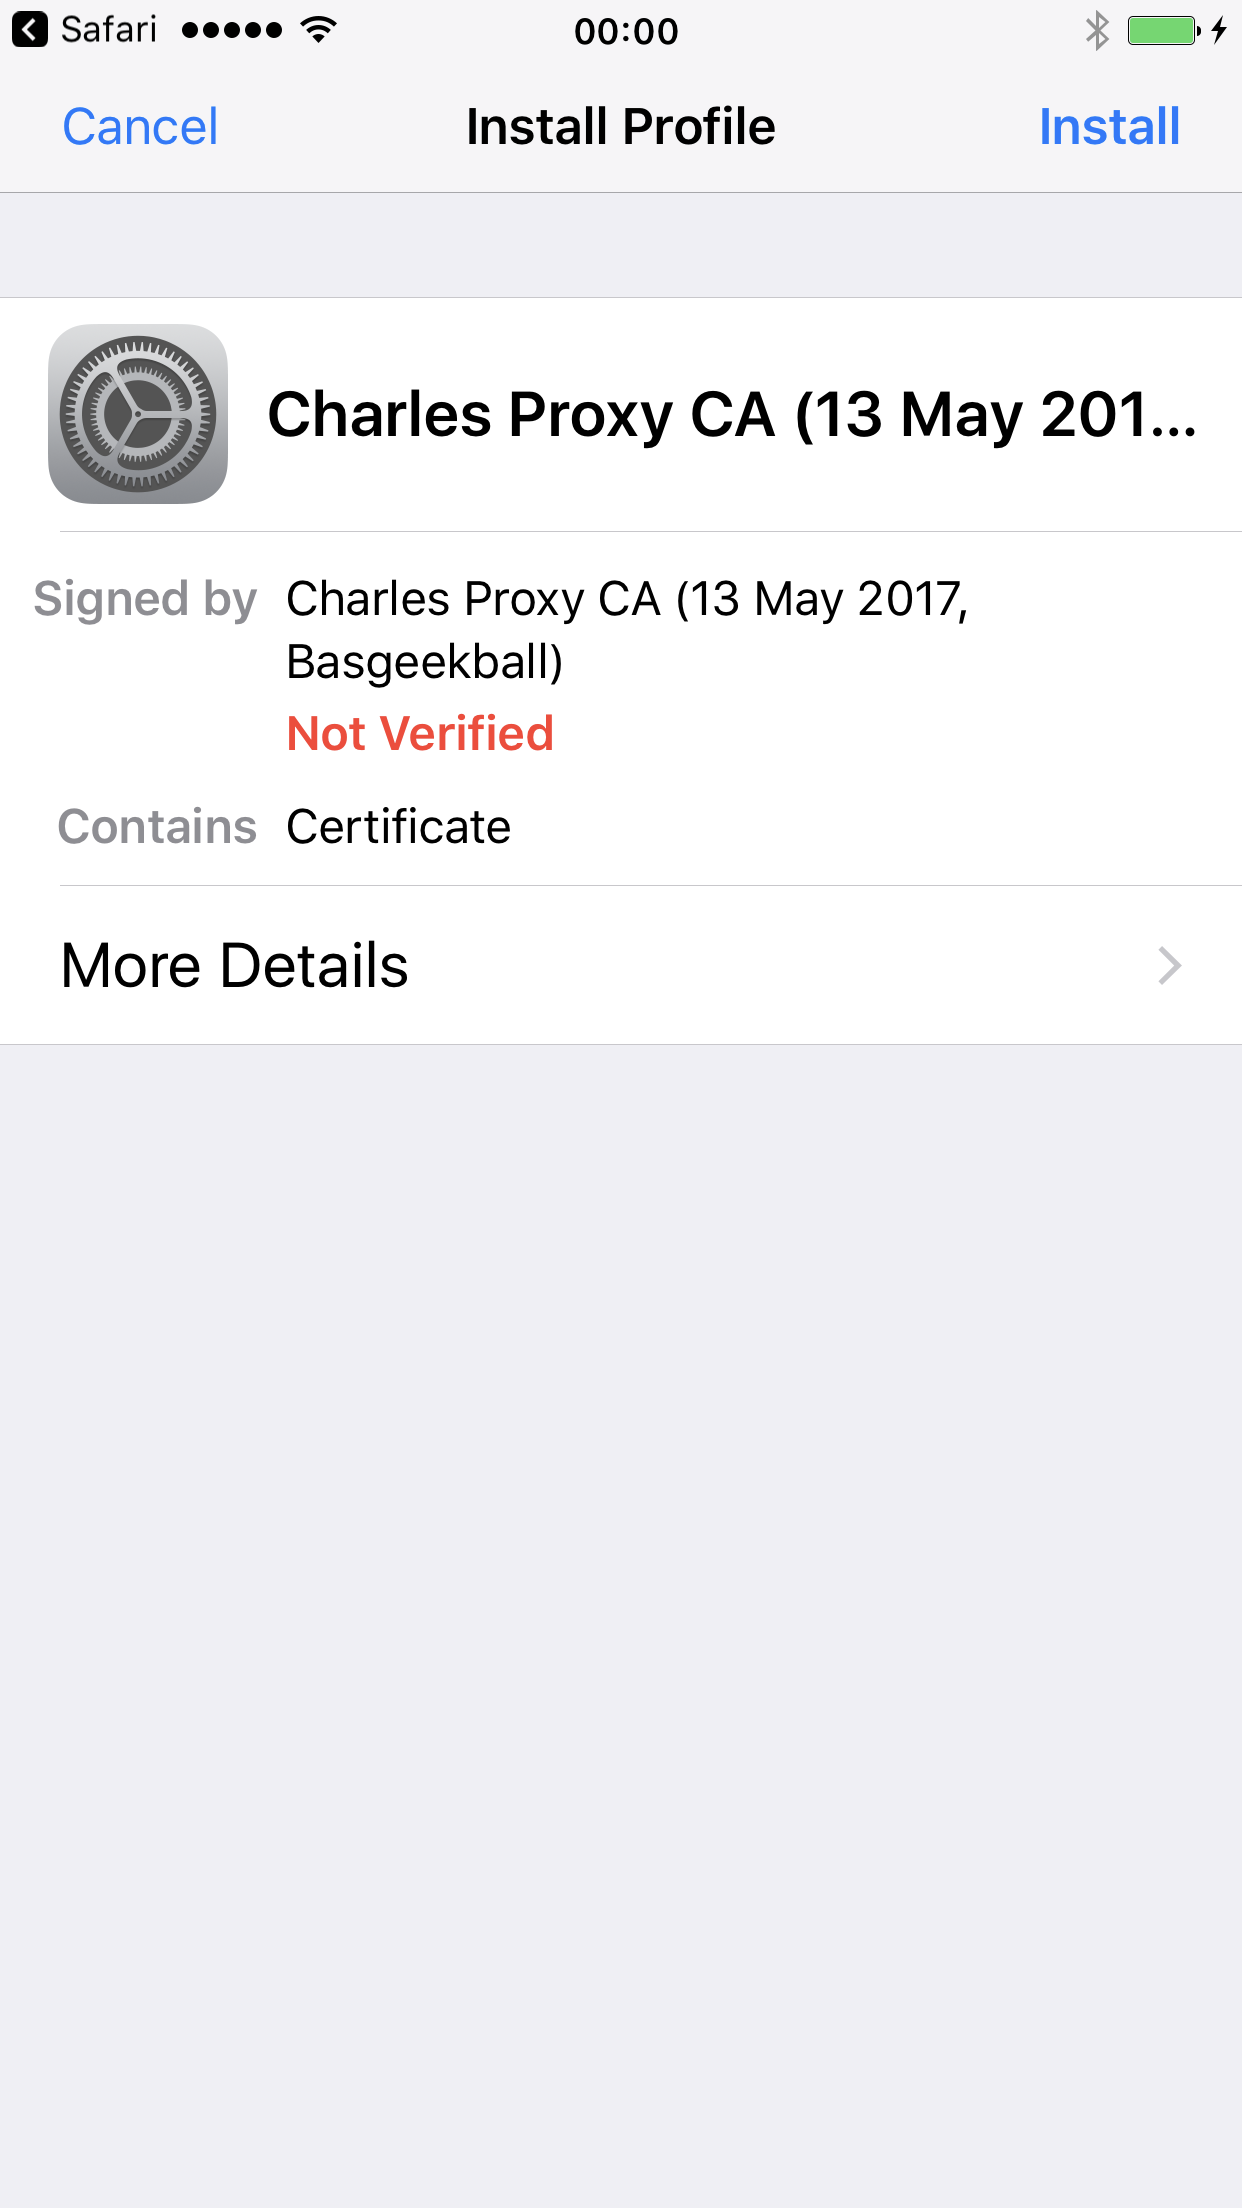
Install Profile in iOS Settings
Open iPhone Settings > General > VPN & Device Management (or "Profile Downloaded" at the top of the Settings main page). Tap "Charles Proxy CA", then tap "Install" in the top-right corner, enter your passcode, and confirm the warning.
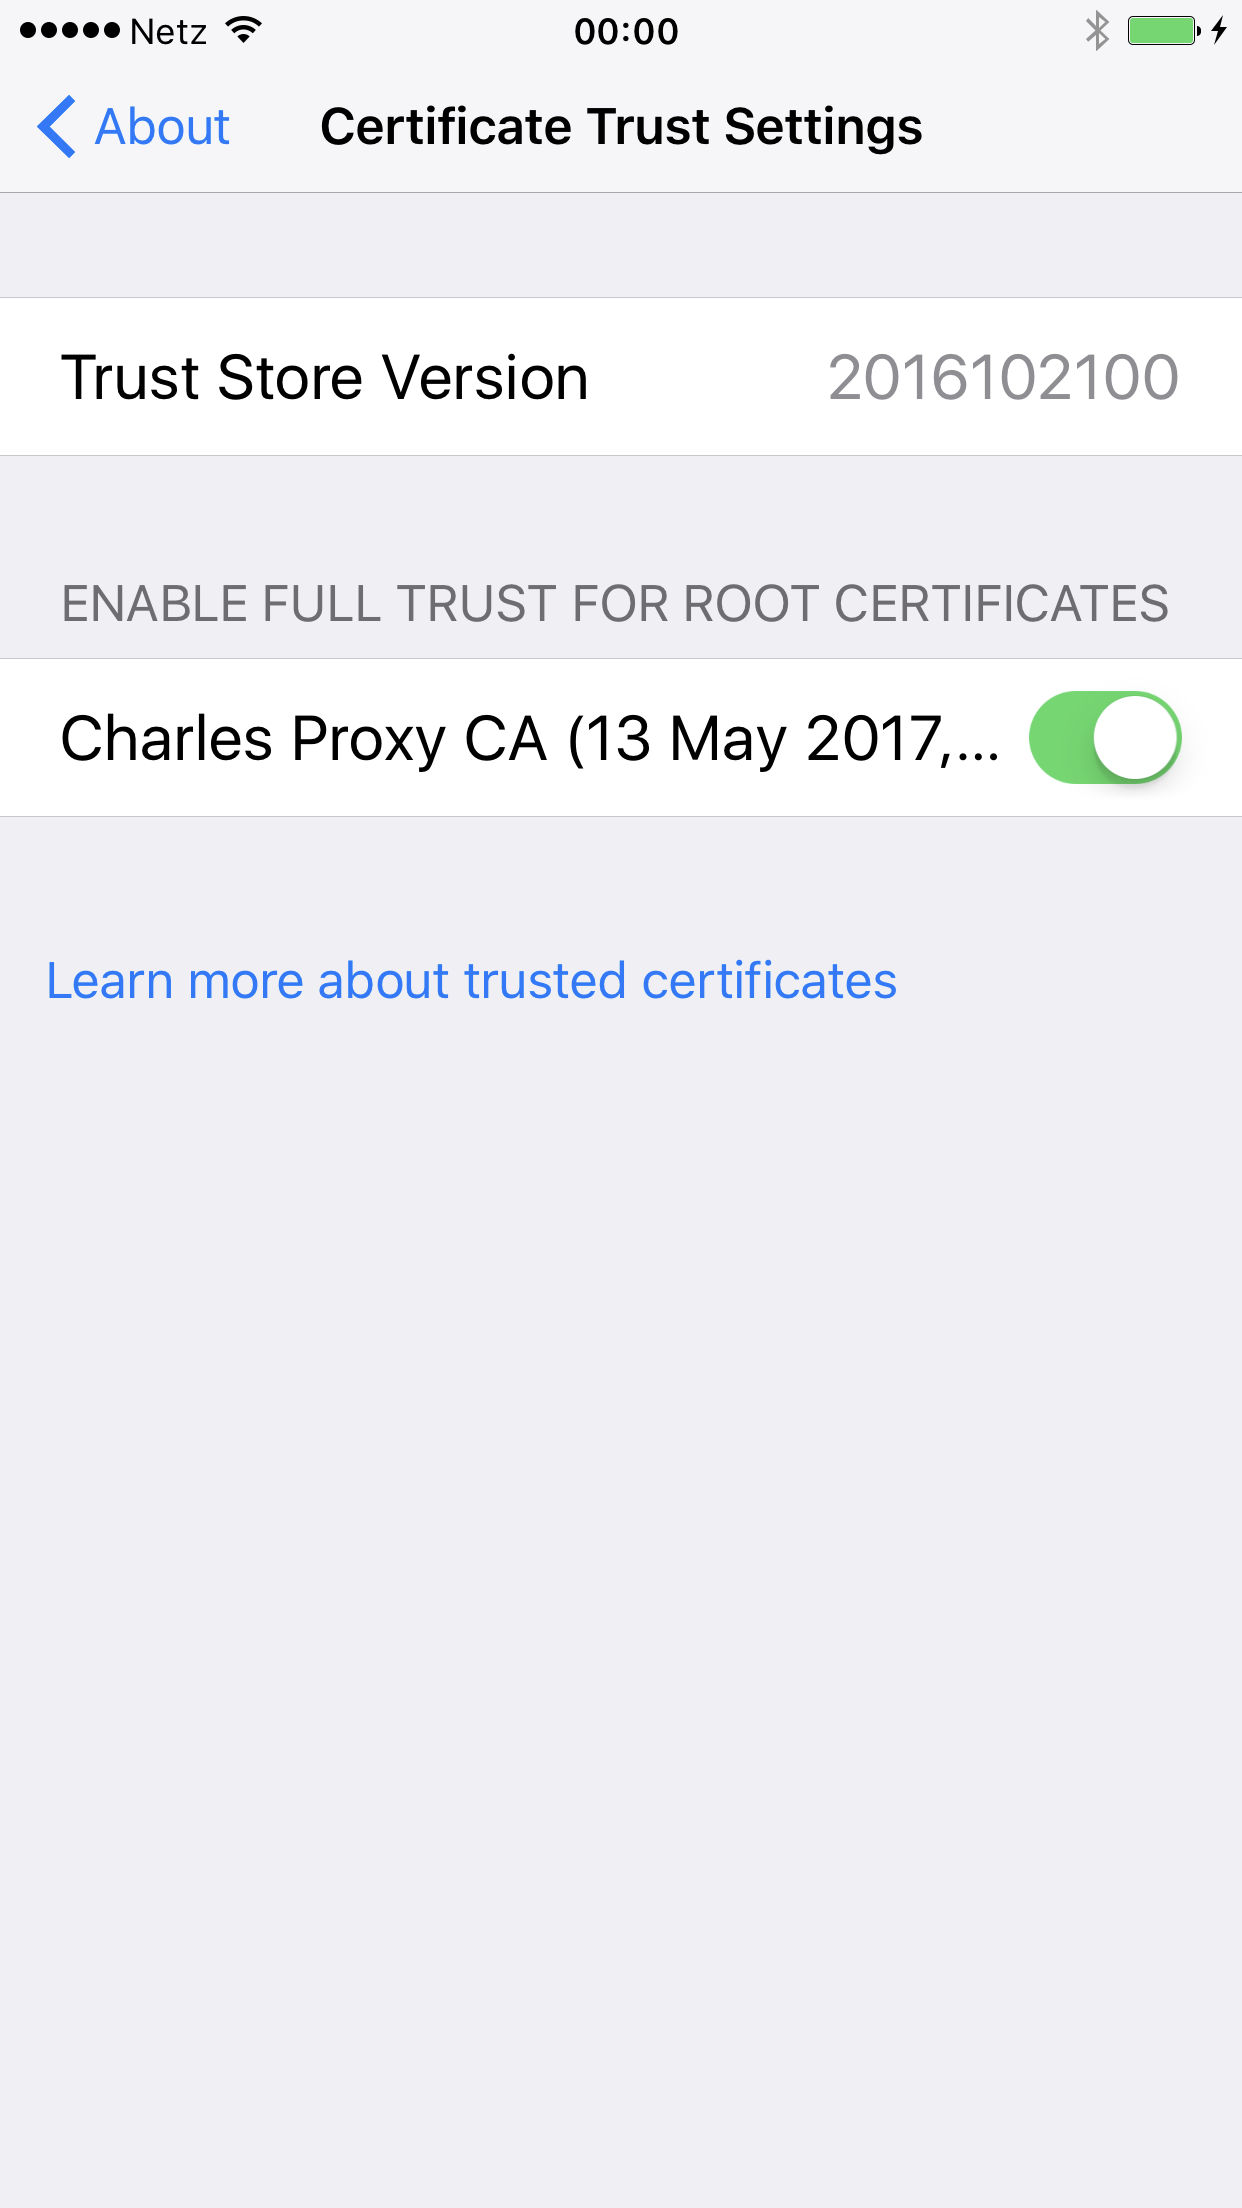
Step 4: Enable Full Trust in Certificate Trust Settings
Crucial step: Installing the profile does NOT automatically enable HTTPS decryption on iOS. Apple requires you to explicitly toggle full root trust in a separate settings screen to prevent unauthorized MITM interception.
-
Open Certificate Trust Settings
On your iPhone, go to Settings > General > About > Certificate Trust Settings (at the very bottom of the About page).
-
Toggle Full Trust for Charles Proxy CA
Under "Enable full trust for root certificates", locate "Charles Proxy CA" and toggle the switch to ON (green).
-
Confirm Root Certificate Warning
iOS will display a warning dialog: "Enabling a root certificate for SSL will allow third parties to view private data...". Tap "Continue".
Step 5: Enable SSL Proxying in Charles for HTTPS Decryption
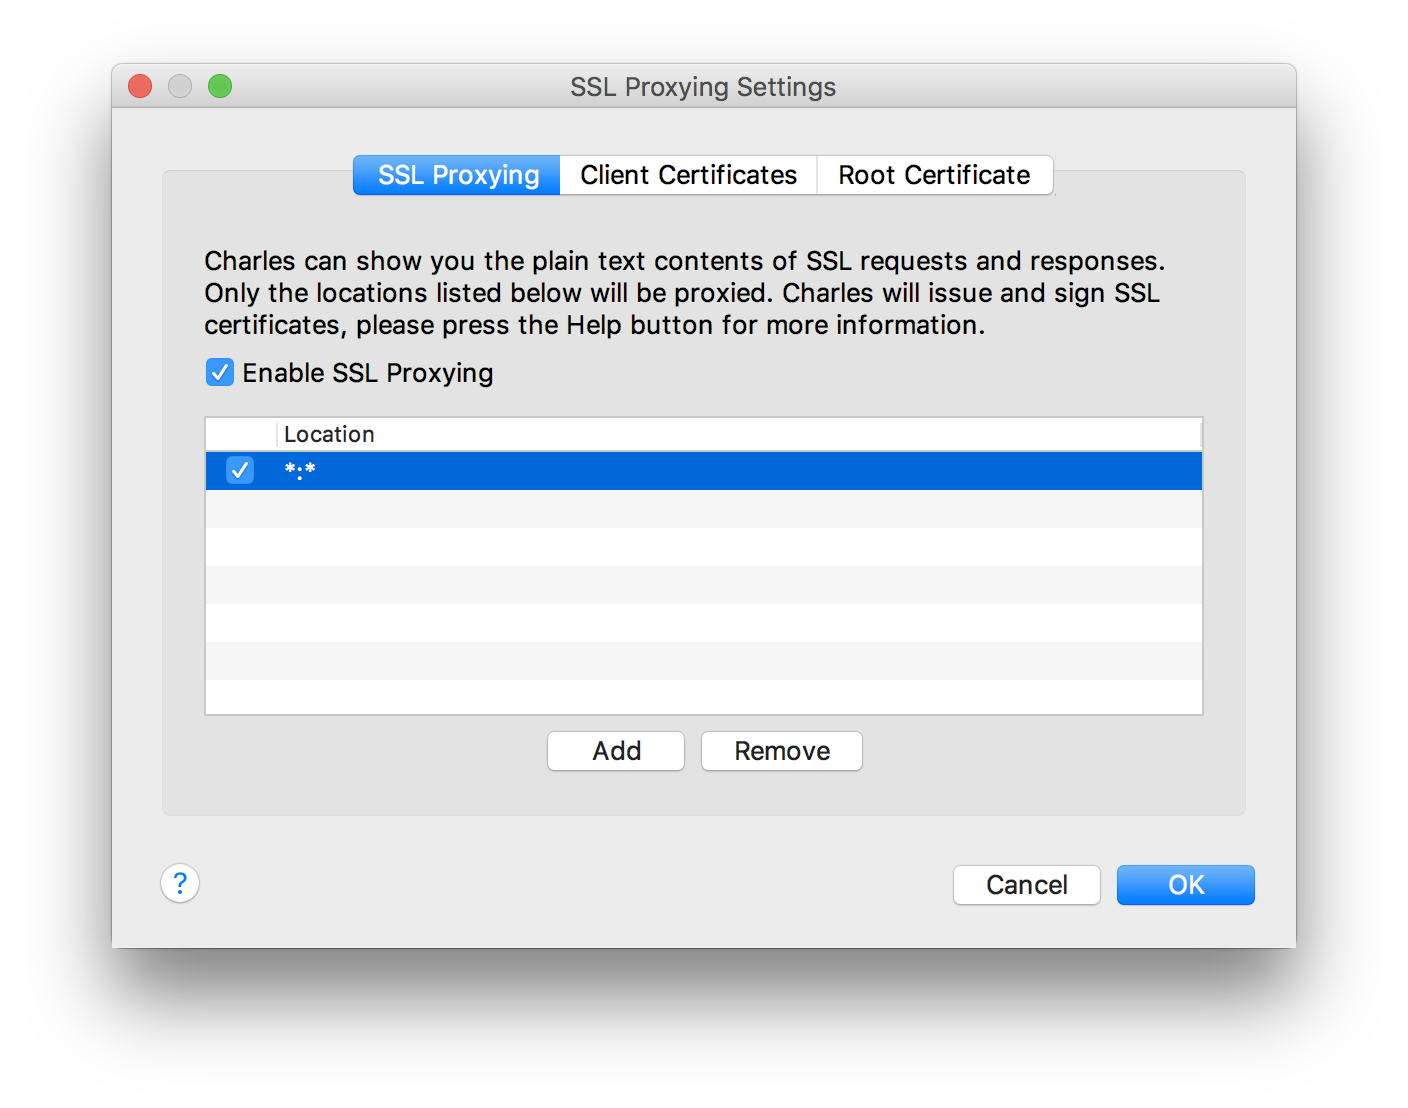
Your iPhone now trusts Charles to sign certificates on behalf of external domains. The final step is instructing Charles to perform SSL Proxying on the target hosts.
-
Open SSL Proxying Settings in Charles
In Charles on your computer, navigate to Proxy > SSL Proxying Settings.
-
Enable SSL Proxying
Check the checkbox for "Enable SSL Proxying".
-
Add Wildcard or Target Hosts
Under the Include tab, click "Add". For broad mobile testing, enter Host: * and Port: 443 (or Port: *). Alternatively, restrict to specific target domains (e.g. *.example.com) to prevent decrypting unrelated traffic.
Step 6: Inspecting Live Decrypted iOS App & Safari Traffic
Open Safari or any native app on your iPhone and perform actions (e.g. search, login, browse). Return to Charles on your desktop:
-
Structure Panel
Requests are grouped by host domain (e.g. https://api.twitter.com or https://instagram.com). Blue lightning bolt icons indicate successful SSL Proxying decryption.
-
Request / Response Payloads
Select any endpoint to view Request Headers, Cookies, Query Parameters, and Response bodies formatted in JSON, XML, or Text.
-
Repeat / Edit & Execute
Right-click any request and choose "Repeat" to replay the call, or "Compose" to edit headers and payload values before firing.
Step 7: iOS SSL Pinning & App Restrictions Explained
While Safari and standard web views decrypt immediately once Certificate Trust is enabled, some third-party iOS apps may fail with connection errors or "SSL Pinning Failure". Understanding why this occurs saves hours of debugging:
| Traffic Category | Behavior with Charles | Technical Reason & Resolution |
|---|---|---|
| Safari & Mobile Browsers | 100% Decrypted | Safari honours the iOS user-trusted root CA in Certificate Trust Settings without restriction. |
| Apps using System NSURLSession | Decrypted | Standard iOS networking libraries trust user-installed root CAs by default. |
| Apps with Hardcoded SSL Pinning | Connection Fails | Apps compare the remote public key against bundled hashes (e.g. TrustKit, AlamoFire ServerTrustPolicy). Bypassing requires a jailbroken device with Frida/SSLKillSwitch2 or testing against an internal development build. |
| Apple Core Services (Siri, iCloud) | Protected / Pinned | Apple pins its internal infrastructure certificates at the operating system level. |
Step 8: Chaining Charles with PXM2 4G/5G Mobile Proxies
When debugging mobile apps, testing from your residential or office broadband IP limits your ability to audit geo-targeted APIs, localized pricing, ad campaigns, and anti-fraud fraud scores. Mobile applications expect mobile carrier network footprints (e.g. AT&T, Verizon, Vodafone, Orange).
By chaining Charles Proxy upstream through PXM2 dedicated 4G/5G mobile modems, you inspect and manipulate requests locally in Charles while presenting authentic cellular IP addresses to remote servers.
Chaining iPhone with Charles on desktop and PXM2 dedicated carrier modems.
To configure upstream chaining in Charles:
-
Open External Proxy Settings
In Charles, go to Proxy > External Proxy Settings.
-
Enable External Proxy
Check "Use external proxy servers". Check "Web Proxy (HTTP)" and "Secure Web Proxy (HTTPS)".
-
Input PXM2 Endpoint & Credentials
Enter your assigned PXM2 gateway hostname and port (e.g. gate.pxm2.io:8000). Check "External proxy requires authentication", then input your proxy username and password.
Step 9: Disabling the Proxy & Troubleshooting Guide
When your debugging session ends, always turn off the proxy on your iPhone. If you close Charles on your workstation while the iPhone's proxy is set to Manual, your phone will be unable to load any web pages or apps.
To revert: Go to Settings > Wi-Fi > tap (i) > Configure Proxy > select Off > tap Save.
Troubleshooting Matrix: Common iPhone Charles Proxy Issues
| 症状 | Probable Root Cause | Fix Action |
|---|---|---|
| iPhone shows "No Internet Connection" | Computer firewall blocking port 8888, or Charles is not running. | Allow incoming connections on port 8888 in Windows Firewall / macOS Application Firewall. Verify Charles is running. |
| chls.pro/ssl shows search results or times out | The iPhone Wi-Fi proxy is not active or pointing to the wrong IP. | Ensure proxy is set to Manual with port 8888 before opening chls.pro/ssl in Safari. |
| Safari shows "This Connection Is Not Private" | Profile installed but Certificate Trust Settings not enabled. | Navigate to Settings > General > About > Certificate Trust Settings and turn on Full Trust for Charles Proxy CA. |
| SSL Proxying shows "unknown" or red padlock in Charles | Host is not included in SSL Proxying Settings. | Go to Proxy > SSL Proxying Settings > Include, and add *:443. |
| VPN app breaks Charles connection | Active VPN tunnel overrides manual Wi-Fi proxy settings. | Disconnect any active VPN profiles on the iPhone while using Charles Proxy. |
Quick Setup Summary: iPhone + Charles Checklist
- Launch Charles Proxy on port 8888
- Help > Local IP Address (e.g. 192.168.1.100)
- Click "Allow" on connection prompt
- Proxy > SSL Proxying Settings > Enable with *:443
- Settings > Wi-Fi > (i) > Configure Proxy > Manual
- Server: [Computer IP] | Port: 8888 | Auth: Off
- Safari: Open chls.pro/ssl > Allow Profile
- Settings > General > VPN & Device Management > Install
- Settings > General > About > Certificate Trust Settings > Full Trust
法国
新加坡
印度
常见问题解答
Why does my iPhone show "No Internet Connection" after setting the proxy?
This occurs if Charles Proxy is not running, your computer firewall blocks port 8888, or the iPhone and computer are not connected to the exact same Wi-Fi network. Also make sure you clicked "Allow" on the Charles incoming connection popup, or added your iPhone IP to Proxy > Access Control Settings.
Why do HTTPS sites in Safari show "This Connection Is Not Private"?
Installing the Charles profile is only the first step. On iOS, you must also manually enable Full Trust: navigate to Settings > General > About > Certificate Trust Settings, find the Charles Proxy CA certificate under "Enable full trust for root certificates", and toggle the switch to ON.
Where is the downloaded Charles profile located in iOS 15, 16, 17, and 18?
In modern iOS versions, after downloading the certificate from chls.pro/ssl in Safari, a notification says "Profile Downloaded". Open Settings > General > VPN & Device Management, tap the Charles Proxy profile under Downloaded Profile, and tap "Install" in the top-right corner.
Why do some iOS apps still fail to decrypt even with Full Trust enabled?
Some security-sensitive iOS applications (such as banking, payment, and major social media apps) use SSL Pinning (e.g. via NSURLSessionDelegate or TrustKit). When an app pins its certificate or public key, it rejects any proxy certificate, including trusted user root CAs. Bypassing pinning requires running a jailbroken device with Frida/SSLKillSwitch2 or testing against a debug build.
How do I chain Charles on iPhone with a PXM2 4G/5G mobile proxy?
In Charles on your computer, navigate to Proxy > External Proxy Settings. Check "Use external proxy servers", enable Web Proxy (HTTP) and Secure Web Proxy (HTTPS), enter your PXM2 gateway hostname and port (e.g., gate.pxm2.io:8000), and enter your proxy credentials. Your iPhone traffic is decrypted locally in Charles and exits to the internet via real mobile carrier cellular IPs.
相关移动代理指南
Explore setup tutorials for mobile devices, developer environments, and network automation across the PXM2 network.
Mobile & Platform Guides
开发人员与自动化指南
Audit iOS Mobile Apps with Authentic Carrier IPs
Combine local Charles debugging on iOS with dedicated 4G/5G cellular modems across 40+ countries. Unlimited data, instant rotation endpoints, and zero datacenter IP bans.
获取移动代理