How to Set Up Charles Proxy on Android
Step-by-step tutorial to configure Charles Proxy on Android. Capture and decrypt HTTP/HTTPS traffic, install the SSL CA certificate, bypass Android 7+ security restrictions, and chain mobile carrier proxies.
- Manual Wi-Fi proxy configuration — route phone traffic directly through your workstation IP and default Charles port 8888.
- SSL CA certificate installation — download from chls.pro/ssl and register as a trusted credential on modern Android 11 through 15.
- Bypass Android 7+ SSL pinning — configure network_security_config.xml for debug builds, or deploy system certs for release APK inspection.
- Upstream mobile proxy chaining — route Charles decrypted requests through genuine 4G/5G carrier IPs to test geo-targeted mobile APIs.
What Is Charles Proxy & Why Use It on Android?
Charles Proxy is a cross-platform HTTP and HTTPS debugging proxy server that sits between client applications and the internet. For mobile engineers, security researchers, and QA specialists, Charles acts as a local man-in-the-middle (MITM) engine. It logs every outbound request initiated by your Android smartphone or emulator, measures endpoint latency, rewrites headers, throttles bandwidth to simulate degraded cellular connectivity, and decrypts TLS payloads in clear, formatted JSON or XML.
While inspecting web browser traffic on desktop machines is straightforward via native DevTools, modern Android mobile applications encrypt their network streams using TLS 1.3 and certificate verification routines. Configuring Charles Proxy for Android allows you to peer inside third-party mobile applications, audit API authentication headers, debug failing mobile payments, verify analytics tracking tags, and diagnose rate-limiting responses before deploying client updates.
View full REST and GraphQL request payloads, inspect Bearer tokens, query parameters, cookies, and re-execute failing calls with modified headers.
Decrypt HTTPS traffic on the fly using dynamically generated root CA certificates, turning unreadable binary TLS streams into readable text.
Chain Charles through PXM2 rotating 4G/5G mobile proxies to debug mobile apps under genuine cellular IPs from 40+ countries without leaving your desk.
Prerequisites & Finding Your Workstation IP
Before configuring your Android device, you must ensure both your computer (running Charles Proxy) and your Android handset or tablet are connected to the exact same local Wi-Fi network. Public coffee shop networks, enterprise guest Wi-Fi, and networks with AP Client Isolation enabled will prevent your phone from reaching port 8888 on your computer.
By default, Charles Proxy listens on HTTP proxy port 8888 across all local interfaces:
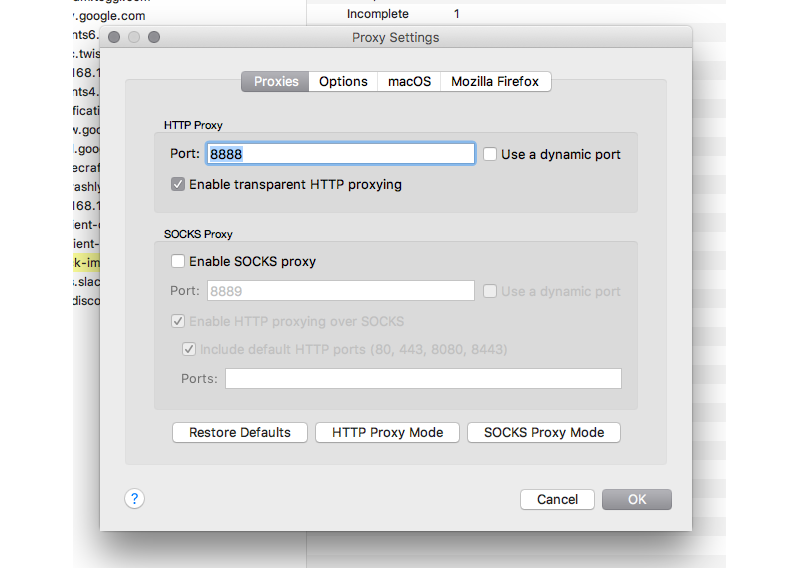
Follow these steps to find your computer's local IPv4 address:
-
Method A: Check Directly Inside Charles Proxy (Easiest)
In Charles Proxy on your computer, click the top menu: Help > Local IP Address. A dialog appears showing your current LAN IPv4 address (for example, 192.168.1.145 or 10.0.0.22).
-
Method B: Check via Command Line Terminal
On macOS or Linux, run ifconfig or ip a in your terminal and look for the en0 or wlan0 inet address. On Windows, open Command Prompt or PowerShell and run ipconfig, noting the IPv4 Address under your active Wi-Fi adapter.
# macOS / Linux terminal:
ip route get 1.1.1.1 | awk '{print $7}'

# Windows PowerShell:
(Get-NetIPAddress -AddressFamily IPv4 -InterfaceAlias 'Wi-Fi*').IPAddress
Firewall Warning: Ensure your workstation firewall (Windows Defender, macOS Application Firewall, or ufw on Linux) allows incoming TCP connections on port 8888. If blocked, your phone will immediately display "No Internet Connection" upon enabling the proxy.
Step 1: Android Wi-Fi Manual Proxy Configuration
With your workstation IP confirmed and Charles Proxy running, configure your Android device's Wi-Fi network adapter to route all outbound TCP traffic through your computer's proxy port.
-
Open Android Wi-Fi Settings
Open Settings > Network & internet > Internet (or Wi-Fi). Long-press or tap the gear icon next to your currently connected Wi-Fi network.
-
Modify Network & Expand Advanced Options
Tap "Modify network" (or the pencil edit icon), then expand "Advanced options".
-
Set Proxy to Manual
In the Proxy dropdown, select "Manual". Enter your computer's local IP (e.g. 192.168.1.145) under Proxy hostname, and type 8888 under Proxy port. Tap Save.
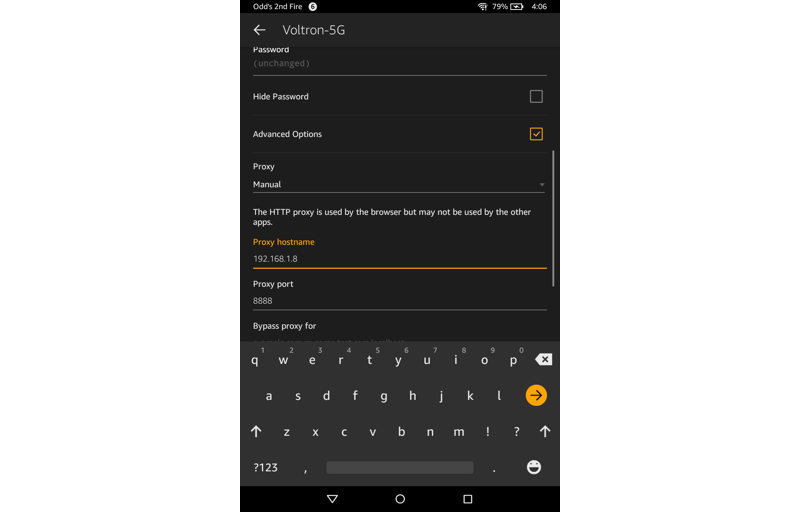
Tap Save. At this moment, all HTTP requests initiated by your Android phone are routed toward your computer on port 8888.
Step 2: Authorizing the Android Connection in Charles
The very moment your phone sends its first network packet through the proxy, Charles Proxy detects a connection from an unfamiliar IP address on your local subnet. For security reasons, Charles blocks access until you explicitly authorize the device.
A modal dialog will pop up on your computer screen asking: "A connection attempt from [phone IP] was received. Do you want to allow it?"

Click Allow. Charles will automatically add your phone's IP address to its Access Control whitelist.
If you accidentally click Deny, or if the prompt never appears, you can configure the Access Control whitelist manually via Proxy > Access Control Settings:
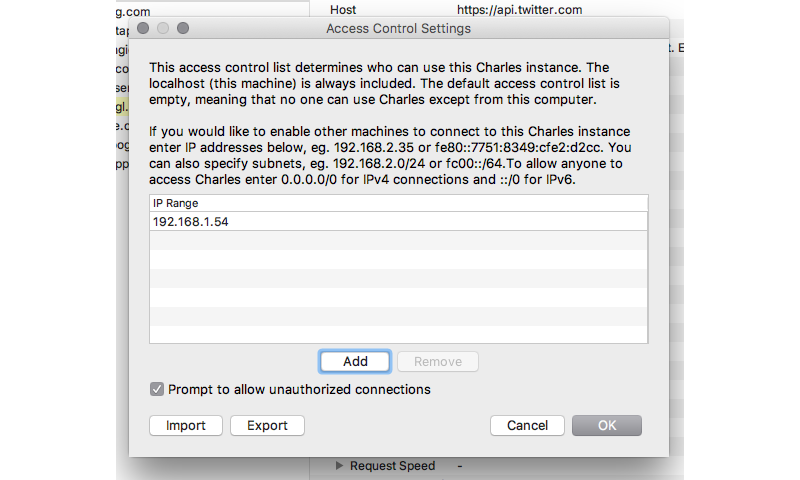
Pro Tip: Adding your entire local subnet (for example, 192.168.1.0/24 or 10.0.0.0/24) to Access Control Settings prevents Charles from prompting you every time your phone's DHCP lease renews with a different IP address.
Step 3: Downloading the Charles SSL Certificate
At this stage, plain HTTP traffic is captured, but all HTTPS traffic appears in Charles as encrypted CONNECT tunnels with padlock icons and garbled payloads. To decrypt TLS streams, Android must trust the Charles Root Certificate Authority (CA).
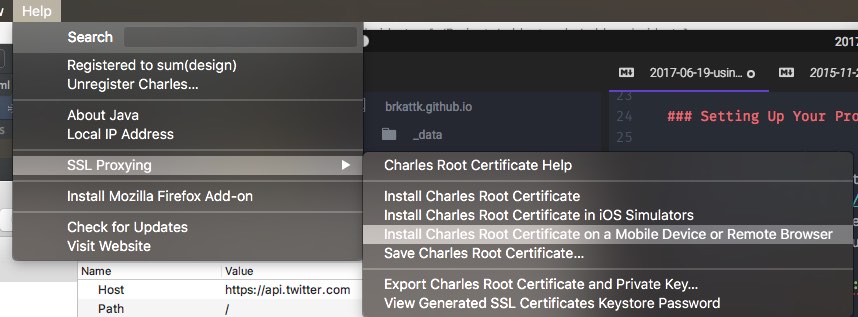
Charles includes built-in instructions and serves its root certificate on demand through a local web gateway:
-
Open Chrome on your Android phone
Do not use in-app webviews or browsers with strict certificate pinning. Use standard Google Chrome or the stock Android browser.
-
Navigate to the certificate download gateway
Type chls.pro/ssl into the address bar and press Enter. (Notice: use http://, not https://).
-
Confirm file download
Charles intercepts this domain and immediately returns its generated root certificate file named getssl.crt or charles-proxy-ssl-proxying-certificate.pem.
Alternative offline export: If your phone cannot reach chls.pro/ssl, open Charles on your PC, navigate to Help > SSL Proxying > Save Charles Root Certificate, save it as a .pem or .crt file, and transfer it to your phone via USB or adb push cert.pem /sdcard/Download/.
Step 4: Installing the CA Certificate on Android
Once downloaded, you must install the certificate into Android's credential store.
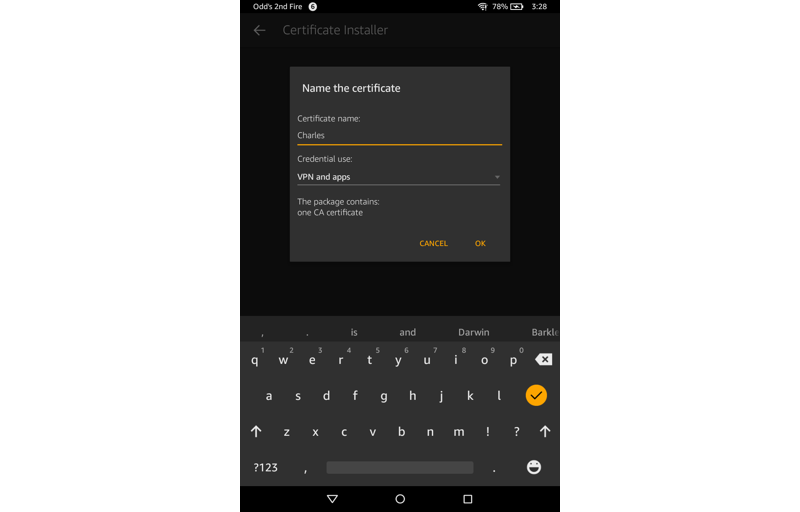
Certificate Installation across Android Versions
| Android Version | Navigation Path in Settings | Behavior & Prompt |
|---|---|---|
| Android 11, 12, 13, 14, 15 | Settings > Security & Privacy > More security settings > Encryption & credentials > Install a certificate > CA certificate | Android displays "Your CA certificate won't be private". Tap "Install anyway", verify lock screen PIN, and select getssl.crt from Downloads. |
| Android 7, 8, 9, 10 | Settings > Security > Install from storage (or tap getssl.crt in Downloads notification) | Direct certificate installation dialog appears. Enter name "Charles Proxy" and tap OK. |
Step 5: Enabling SSL Proxying for HTTPS Decryption
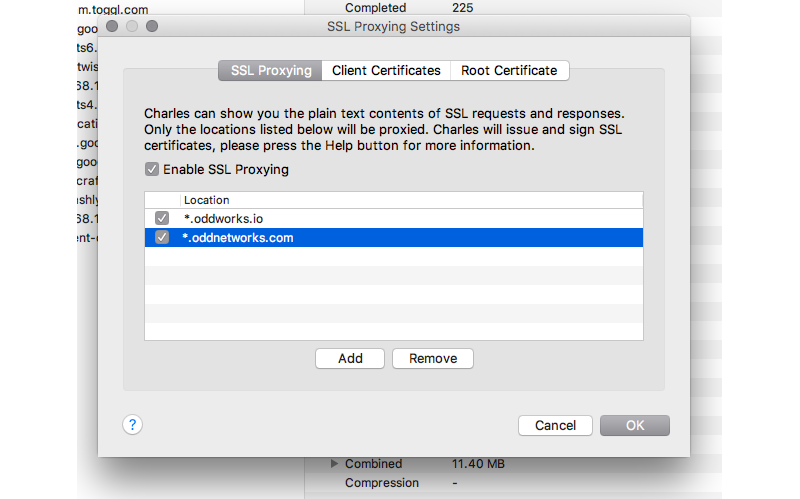
Installing the certificate on your phone equips it to validate Charles-generated SSL certificates. However, Charles itself will not attempt to decrypt HTTPS traffic until you configure SSL Proxying rules.
-
Open SSL Proxying Settings in Charles
In Charles top menu, navigate to Proxy > SSL Proxying Settings.
-
Enable SSL Proxying
Ensure the checkbox "Enable SSL Proxying" is checked.
-
Add Target Wildcard Rule (*:* or *:443)
Under the Include tab, click "Add". In the Host field, type * (asterisk) to decrypt all domains, or specify a targeted domain such as *.example.com. In the Port field, type 443 (or *), then click OK.
Step 6: Android 7+ Network Security Config & SSL Pinning
If you open Google Chrome on Android now, you will notice all HTTPS websites decrypt successfully. However, when you launch your native mobile application, requests may fail with SSLHandshakeException: Trust anchor for certification path not found.
Starting in Android 7.0 (API Level 24), Google altered the default trust policy: native applications no longer trust user-installed CA certificates unless the app developer explicitly permits them in the application manifest.
Solution A: For Developers (Apps You Are Building)
If you have access to the app source code, create a network security configuration file to instruct debug builds to trust user certificates.
<?xml version="1.0" encoding="utf-8"?>
<network-security-config>
    <debug-overrides>
        <trust-anchors>
            <!-- Trust system CAs and user-installed CAs (Charles) in debug builds -->
            <certificates src="system" />
            <certificates src="user" />
        </trust-anchors>
    </debug-overrides>
</network-security-config>
Then reference this configuration in your AndroidManifest.xml file under the <application> tag:
<application
    android:name=".MainApplication"
    android:icon="@mipmap/ic_launcher"
    android:label="@string/app_name"
    android:networkSecurityConfig="@xml/network_security_config">
    ...
</application>
Solution B: For Third-Party Applications (Security Audits & Reverse Engineering)
When analyzing third-party production APKs where you cannot edit source code, use one of three established bypass mechanisms:
| Technique | Requirements | How It Bypasses Certificate Restrictions |
|---|---|---|
| Magisk TrustUserCerts Module | Rooted phone or Magisk emulator | Moves certificates from the User store (/data/misc/user/0/cacerts-added) into the System store (/system/etc/security/cacerts), making apps believe Charles is a pre-installed factory CA. |
| Frida Dynamic Hooking | frida-server on device | Hooks OkHttp3 CertificatePinner, TrustManagerImpl, and Conscrypt classes in memory at runtime to force SSL validation checks to return true. |
| APKTool Patching | Non-rooted device | Decompiles the APK with apktool d app.apk, injects network_security_config.xml, sets android:debuggable="true", and resigns with uber-apk-signer. |
Step 7: Chaining Charles with PXM2 4G/5G Mobile Proxies
While Charles inspects and decrypts packets locally, the requests leaving your workstation carry your home or office broadband IP. When auditing anti-fraud defenses, Instagram/TikTok mobile automation, or geo-restricted streaming APIs, targets will flag datacenter or residential broadband IP patterns from mobile user-agents.
You can chain Charles Proxy upstream through PXM2 dedicated 4G/5G mobile modems. In this architecture, Charles decrypts and displays requests locally on your desktop screen, while PXM2 dispatches the actual requests to the target over authentic mobile carrier radio networks.
Full upstream proxy chaining workflow connecting Android to Charles and PXM2 cellular modems.
To configure upstream chaining in Charles:
-
Navigate to External Proxy Settings
In Charles, click Proxy > External Proxy Settings.
-
Enable External Proxy Servers
Check "Use external proxy servers". Check both "Web Proxy (HTTP)" and "Secure Web Proxy (HTTPS)".
-
Enter PXM2 Gateway Credentials
In Web Proxy Server, enter your assigned PXM2 gateway hostname and port (for example, gate.pxm2.io:8000). Check "External proxy requires authentication", then input your username and password.
Step 8: Disabling the Proxy & Troubleshooting Common Errors
When your testing session concludes, remember to turn off the proxy on your phone. If you close Charles on your workstation while the Android Wi-Fi proxy is still enabled, your phone will lose all internet connectivity.
To revert: Return to Settings > Network & internet > Wi-Fi > Edit Network > Advanced options, and change Proxy from Manual back to None.
Troubleshooting Matrix: Android Charles Proxy Issues
| Observed Issue / Error | 根本原因 | Fix Action |
|---|---|---|
| Phone shows "No Internet Connection" immediately | Port 8888 blocked by PC firewall or phone IP denied in Charles Access Control. | Allow port 8888 in Windows Firewall / macOS Pfctl. Open Charles Proxy > Access Control Settings and add your subnet (e.g. 192.168.1.0/24). |
| chls.pro/ssl times out or shows external website | Wi-Fi proxy is not yet active on the phone or is pointing to the wrong IP. | Verify your computer IP did not change via DHCP. Ensure proxy is set to Manual with port 8888 before browsing to chls.pro/ssl. |
| SSLHandshake: Received fatal alert: certificate_unknown | The CA certificate is not installed, or app enforces Android 7+ user CA restrictions. | Check Settings > Security > Trusted credentials > User tab to confirm Charles CA is present. Implement network_security_config.xml or use Magisk TrustUserCerts. |
| Lock icon with red X next to requests in Charles | SSL Proxying is disabled for the requested host or port. | Right-click the host in the Structure panel and click "Enable SSL Proxying", or add *:443 under Proxy > SSL Proxying Settings. |
| App shows connection error despite valid certificate | Application implements hardcoded SSL Pinning (e.g. OkHttp CertificatePinner). | Use Frida with an SSL unpinning script (e.g. frida-multiple-unpinning) to disable certificate hashing checks dynamically. |
法国
新加坡
印度
常见问题解答
Why does Android show "No Internet" after setting up Charles Proxy?
This happens when Charles Proxy is not running, the computer firewall blocks inbound connections on port 8888, or your Android device is not connected to the exact same Wi-Fi subnet. Verify your computer local IP address, ensure Charles is running and that you clicked "Allow" on the connection prompt, and allow port 8888 in Windows Defender or macOS Application Firewall.
Why do HTTPS requests fail with SSL handshake errors in Charles Proxy?
Since Android 7.0 (API level 24), Android apps do not trust user-installed CA certificates by default. While Chrome can browse HTTPS sites after you install the certificate, native apps will throw SSLHandshakeException unless the app includes a network_security_config.xml file trusting user certificates, or the certificate is moved into the system trust store on a rooted device or emulator.
How do I download the Charles certificate if chls.pro/ssl does not open?
You must configure your Android Wi-Fi proxy to point to Charles (computer IP and port 8888) BEFORE opening chls.pro/ssl in your mobile browser. Charles intercepts this exact domain to serve its root certificate. Alternatively, in Charles on your PC, navigate to Help > SSL Proxying > Save Charles Root Certificate, transfer the .pem or .crt file to your phone via USB or adb, and install it.
Where is the CA certificate installation option in Android 11, 12, 13, 14, and 15?
In Android 11 and later, tapping a certificate file no longer installs it directly. Open Settings > Security (or Security & Privacy) > More security settings > Encryption & credentials > Install a certificate > CA certificate. Tap "Install anyway" on the security warning, authenticate with your PIN/fingerprint, and select the downloaded getssl.crt file from your Downloads folder.
How do I chain Charles Proxy with a PXM2 4G/5G mobile proxy?
In Charles, go to Proxy > External Proxy Settings. Check "Use external proxy servers", select "Web Proxy (HTTP)" and "Secure Web Proxy (HTTPS)", enter your PXM2 proxy hostname and port (e.g., gate.pxm2.io:8000), check "External proxy requires authentication", and enter your PXM2 credentials. All outbound traffic from your Android device will route through Charles for local inspection and exit via real mobile carrier cellular IPs.
相关移动代理指南
浏览 PXM2 网络中关于编程语言、操作系统和自动化平台的安装教程。
平台与操作系统指南
开发人员与自动化指南
Test Mobile Apps Through Real 4G/5G Carrier IPs
Combine local Charles debugging with dedicated cellular carrier modems across 40+ countries. Unlimited data, instant rotation endpoints, and zero datacenter IP bans.
获取移动代理